

Designing a Tarot Deck: Everything I Needed to Do Before I Started Drawing, Part 1
Setting Goals, Doing Research, and Creating My Own Tools
Although I made the decision to design and illustrate a tarot deck last fall, I wasn’t able to start working on it until January. The end of the year is usually a busy time for me and the final months of 2025 were even more hectic than usual. I had a couple of projects to wrap up between three trips out of state to visit family. Two of those trips were planned. One was not. After returning home in early January, I took a short break to recover from my travels. Then, I got to work.
Setting Goals
I started the project by defining my goals and expectations. For creative projects, I prefer to keep those as simple as possible. The beginning of a project is when I have the least information about the direction it is likely to go. It doesn’t make much sense to spend a ton of time up front working out a plan that isn’t likely to survive contact with reality. Instead, I start with the bare minimum I need to move forward. To get started, all I need to know is why I am doing it, what success looks like, which decisions have already been made, and the next couple of steps. For each step I complete along the way, I add another. That way, I am never looking more than two steps ahead, which makes it easier to pivot when necessary.
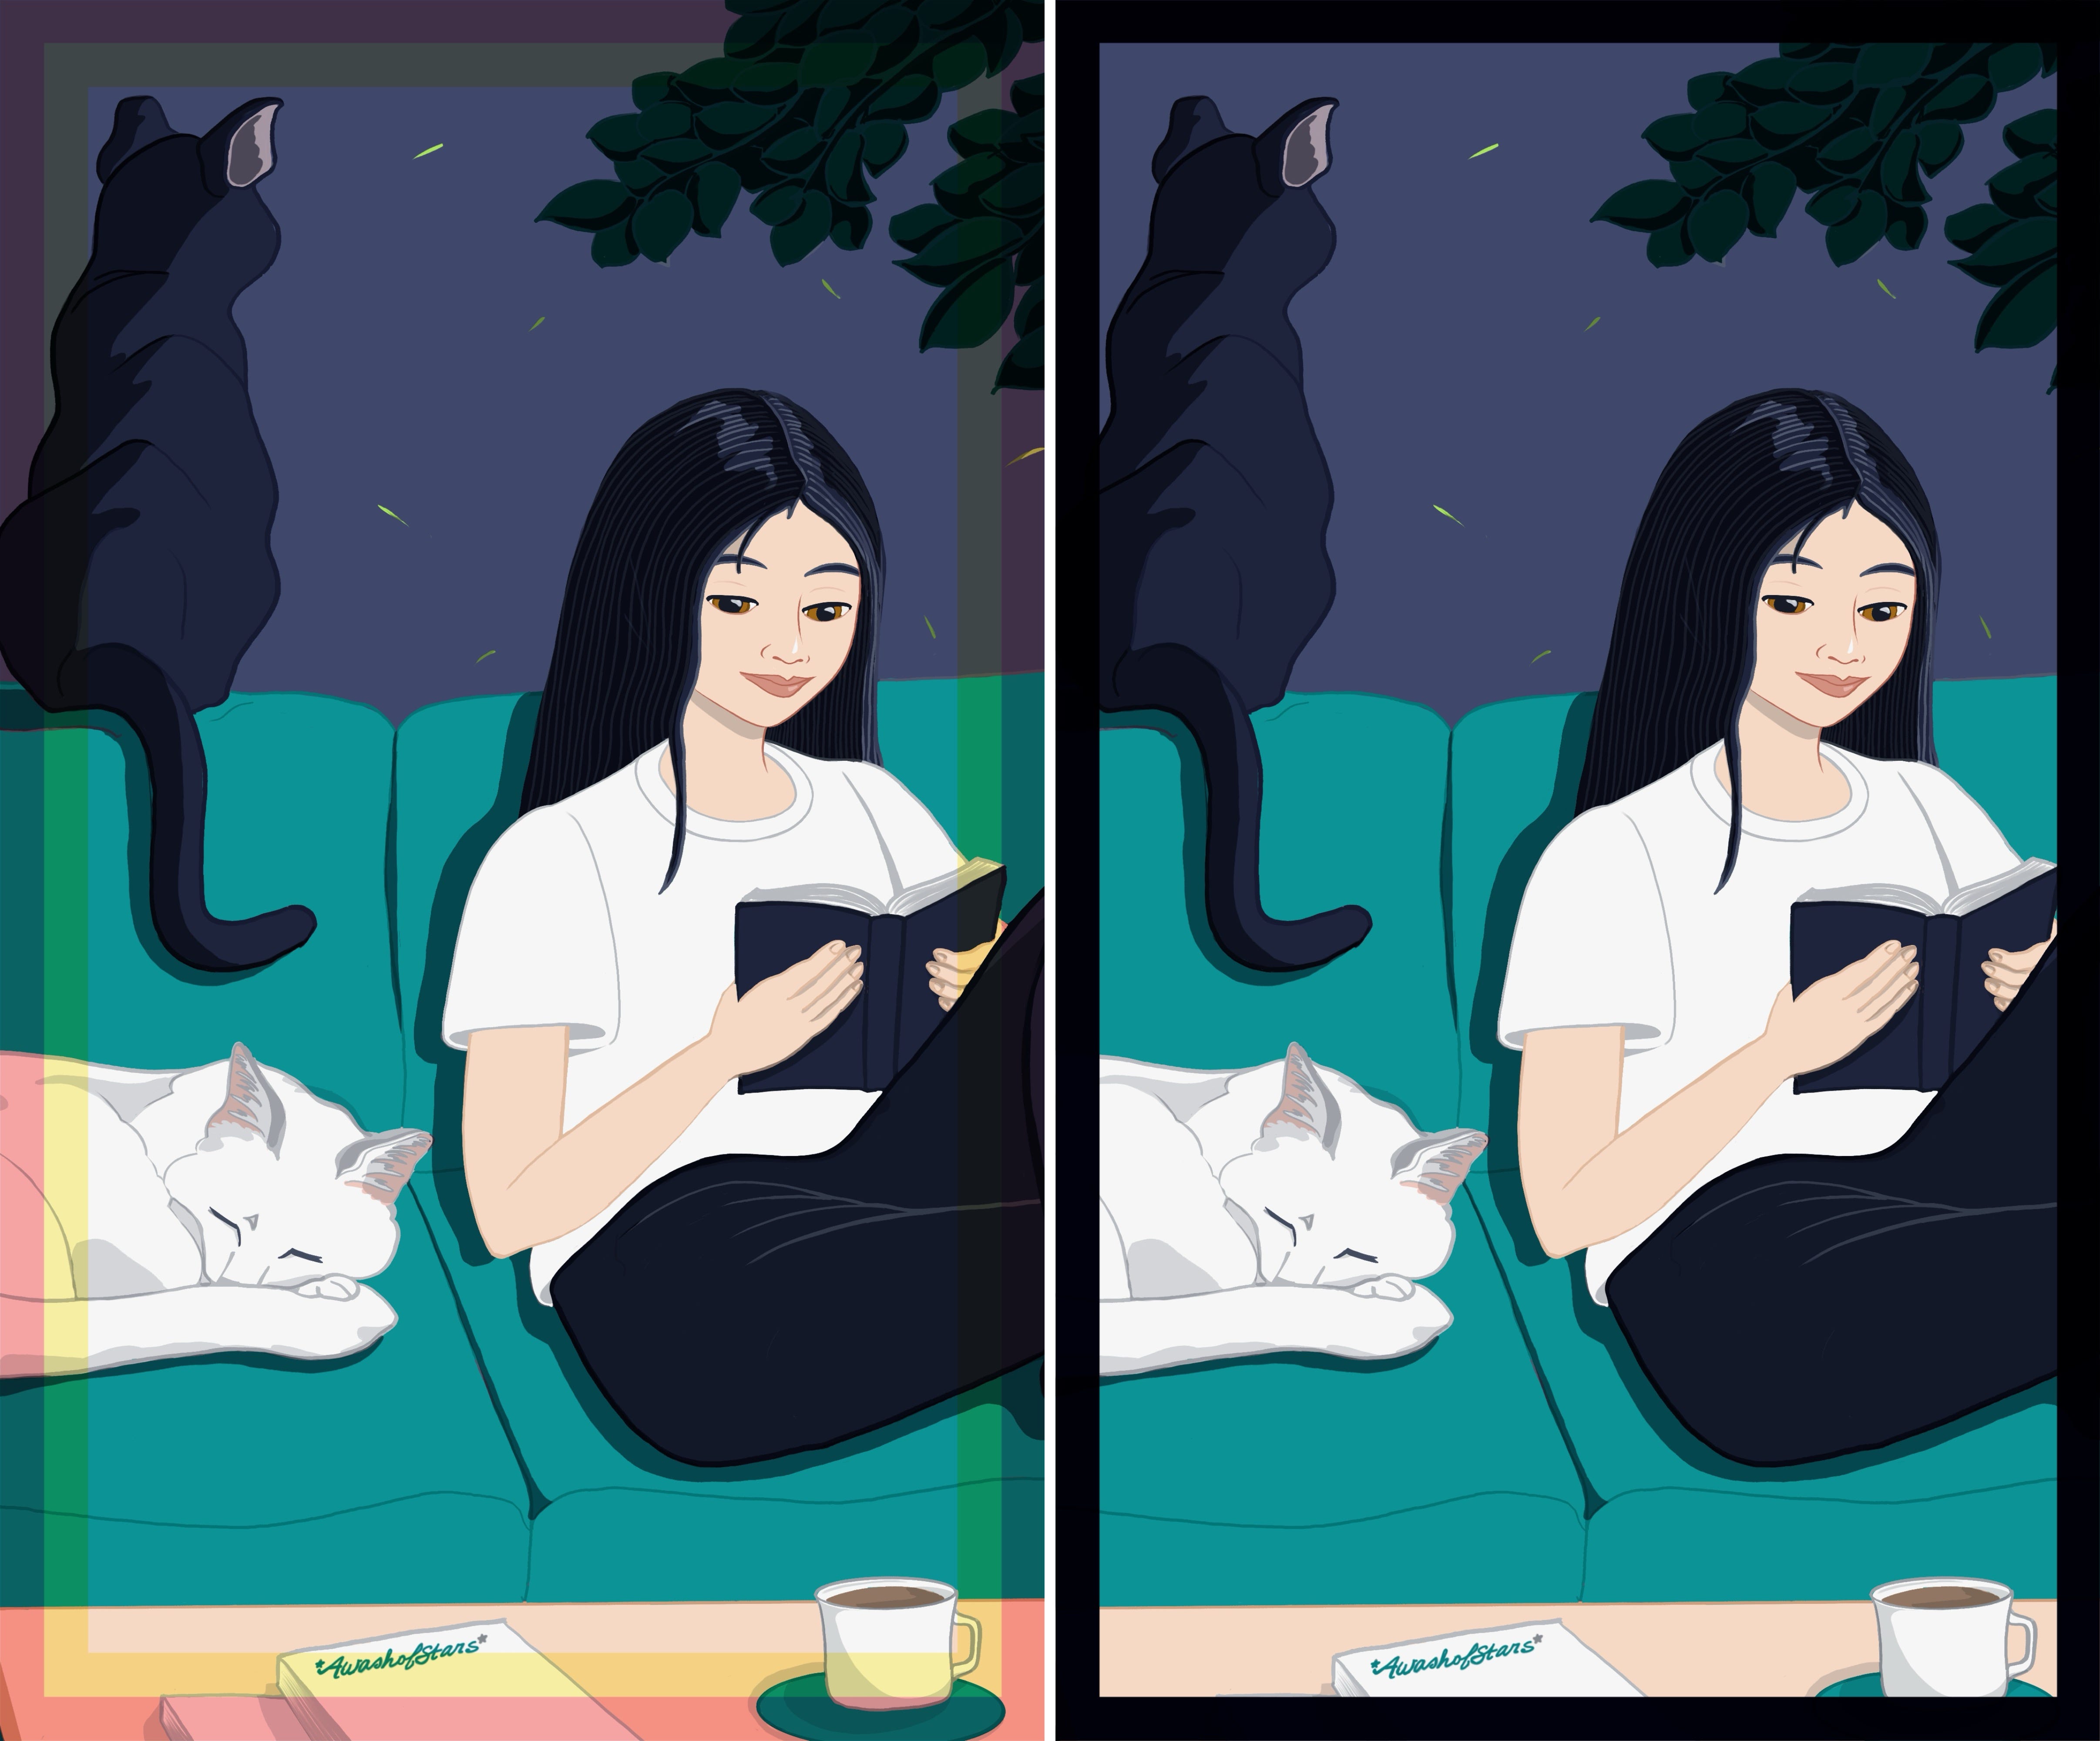
Back in January, I knew I wanted to design and illustrate a tarot deck for creatives that tells the story of The Fool’s Journey through the lens of a young woman’s development as a writer. She became an artist in May thanks to an idea I had for one of the cards, but I initially thought of her as a writer. I knew this young woman’s name would be Mei and that her cats, Sid and Tally, would act as guides, subtly and not-so-subtly nudging her in the right direction. I also knew I would be drawing and coloring all of the illustrations by hand in Procreate and that the project would not feel complete until I held a physical copy of the deck in my hands.
Researching Printing Options
Because I planned to print my deck at the end of the project, I knew I would have to do a little research. Although I have some experience with printing, I have exactly zero experience having cards printed. I spent the next couple of weeks scouring artists’ blogs and tarot forums searching for tips and recommendations from artists who had already done what I hope to do. Then, I spent a few weeks looking at the websites of printers and traditional publishers, trying to get a feel for the types of card stock, finishes, booklets and packaging that are generally available as well as their requirements for submitting artwork for printing.
I used the results of this research to make a few decisions about the digital illustrations I will be creating for the deck. All of the illustrations will be 6” x 10” in size and have a resolution of 300 dpi. They will be created using an RGB color profile. If you are not familiar with RGB and CMYK color profiles, they refer to the way colors are mixed. RGB stands for red, green, and blue and CMYK stands for cyan, magenta, yellow, and key. Many treat it as a rule of thumb that RGB is for the web and CMYK is for printing, but it’s not really that simple. I decided to create the illustrations in sRGB because I’ll be posting the illustrations online first and a few of the printers require that color profile. I’ve accepted the fact that I may need to convert the illustrations to a CMYK profile if that is the preference of the printer I ultimately choose, but that is a problem for later.
Making My Own Tools
I completed the printing options research in the beginning of March. Then, I took two weeks off for travel. When I returned at the end of the month, the first thing I did was make myself a template with a couple of overlays to help me identify the bleed, the safe zone and the edges of the cards. If you’re not familiar with those terms, printing with bleed refers to the process of printing an image slightly larger than the finished product so that the illustration goes all the way to the edge of the page. Bleed is the area that is intended to be removed. Extending an illustration to the size of the print plus bleed ensures your artwork will go cleanly to the edges once trimmed. Due to the natural shifting of paper, some of that additional artwork created as bleed might make it into the print and a roughly equivalent amount of of art on the other side of the page might be lost. For that reason, artists keep anything essential within an area known as the safe zone.
I pasted a cropped version of the illustration that inspired this deck into the template I made so you can see what I will see while drawing. This illustration will not be part of the deck. I’m just using it to model the overlays for you. Both of these overlays are just layers that can be turned on and off as I work. In the first, the area beneath the red border is the bleed and the area beneath the yellow border is the area outside of the safe zone. In this sample image, you can see my signature is outside of the safe zone, which means it could be cut off when the card is trimmed. In the second overlay, the black border covers the bleed. I created it in order to get an idea of what the final illustration will look like when printed.
Brainstorming and Testing Ideas
After I finished the template, I started making a list of all of the things I wanted to include in this deck. While working with tarot cards over the past twenty years, I have noticed several natural connections between cards that aren’t echoed in the artwork of the RWS deck or any of the modern decks with which I have experience. One of the things I am planning to do with my deck is make those connections more explicit by creating visual ties between the related cards. Another thing I am planning to do is modify a few of the correspondences for the Major Arcana. I spent the last couple of months testing them to make sure they will work.
We are now caught up to the present. My next steps will be working out the visual design of the deck and fleshing out Mei, Sid and Tally’s characters. I am planning to include one card for Sid and one for Tally as bonus cards for this deck. I hope you will love these characters as much as I do. I’ll have another progress update for you around this time next month.
A Small Token of My Appreciation
If you have read this far, thank you so much for taking the time! As a small token of my appreciation, I’d like to share a spread I created with you. If you are a tarot reader, the shape of this spread will look familiar. However you feel about it, the Celtic Cross is usually among the first spreads tarot readers learn. I modified it in order to help beginners learn basic numerology. I call this spread the Journey Spread. If you have a moment, I’d love to hear what you think of it.
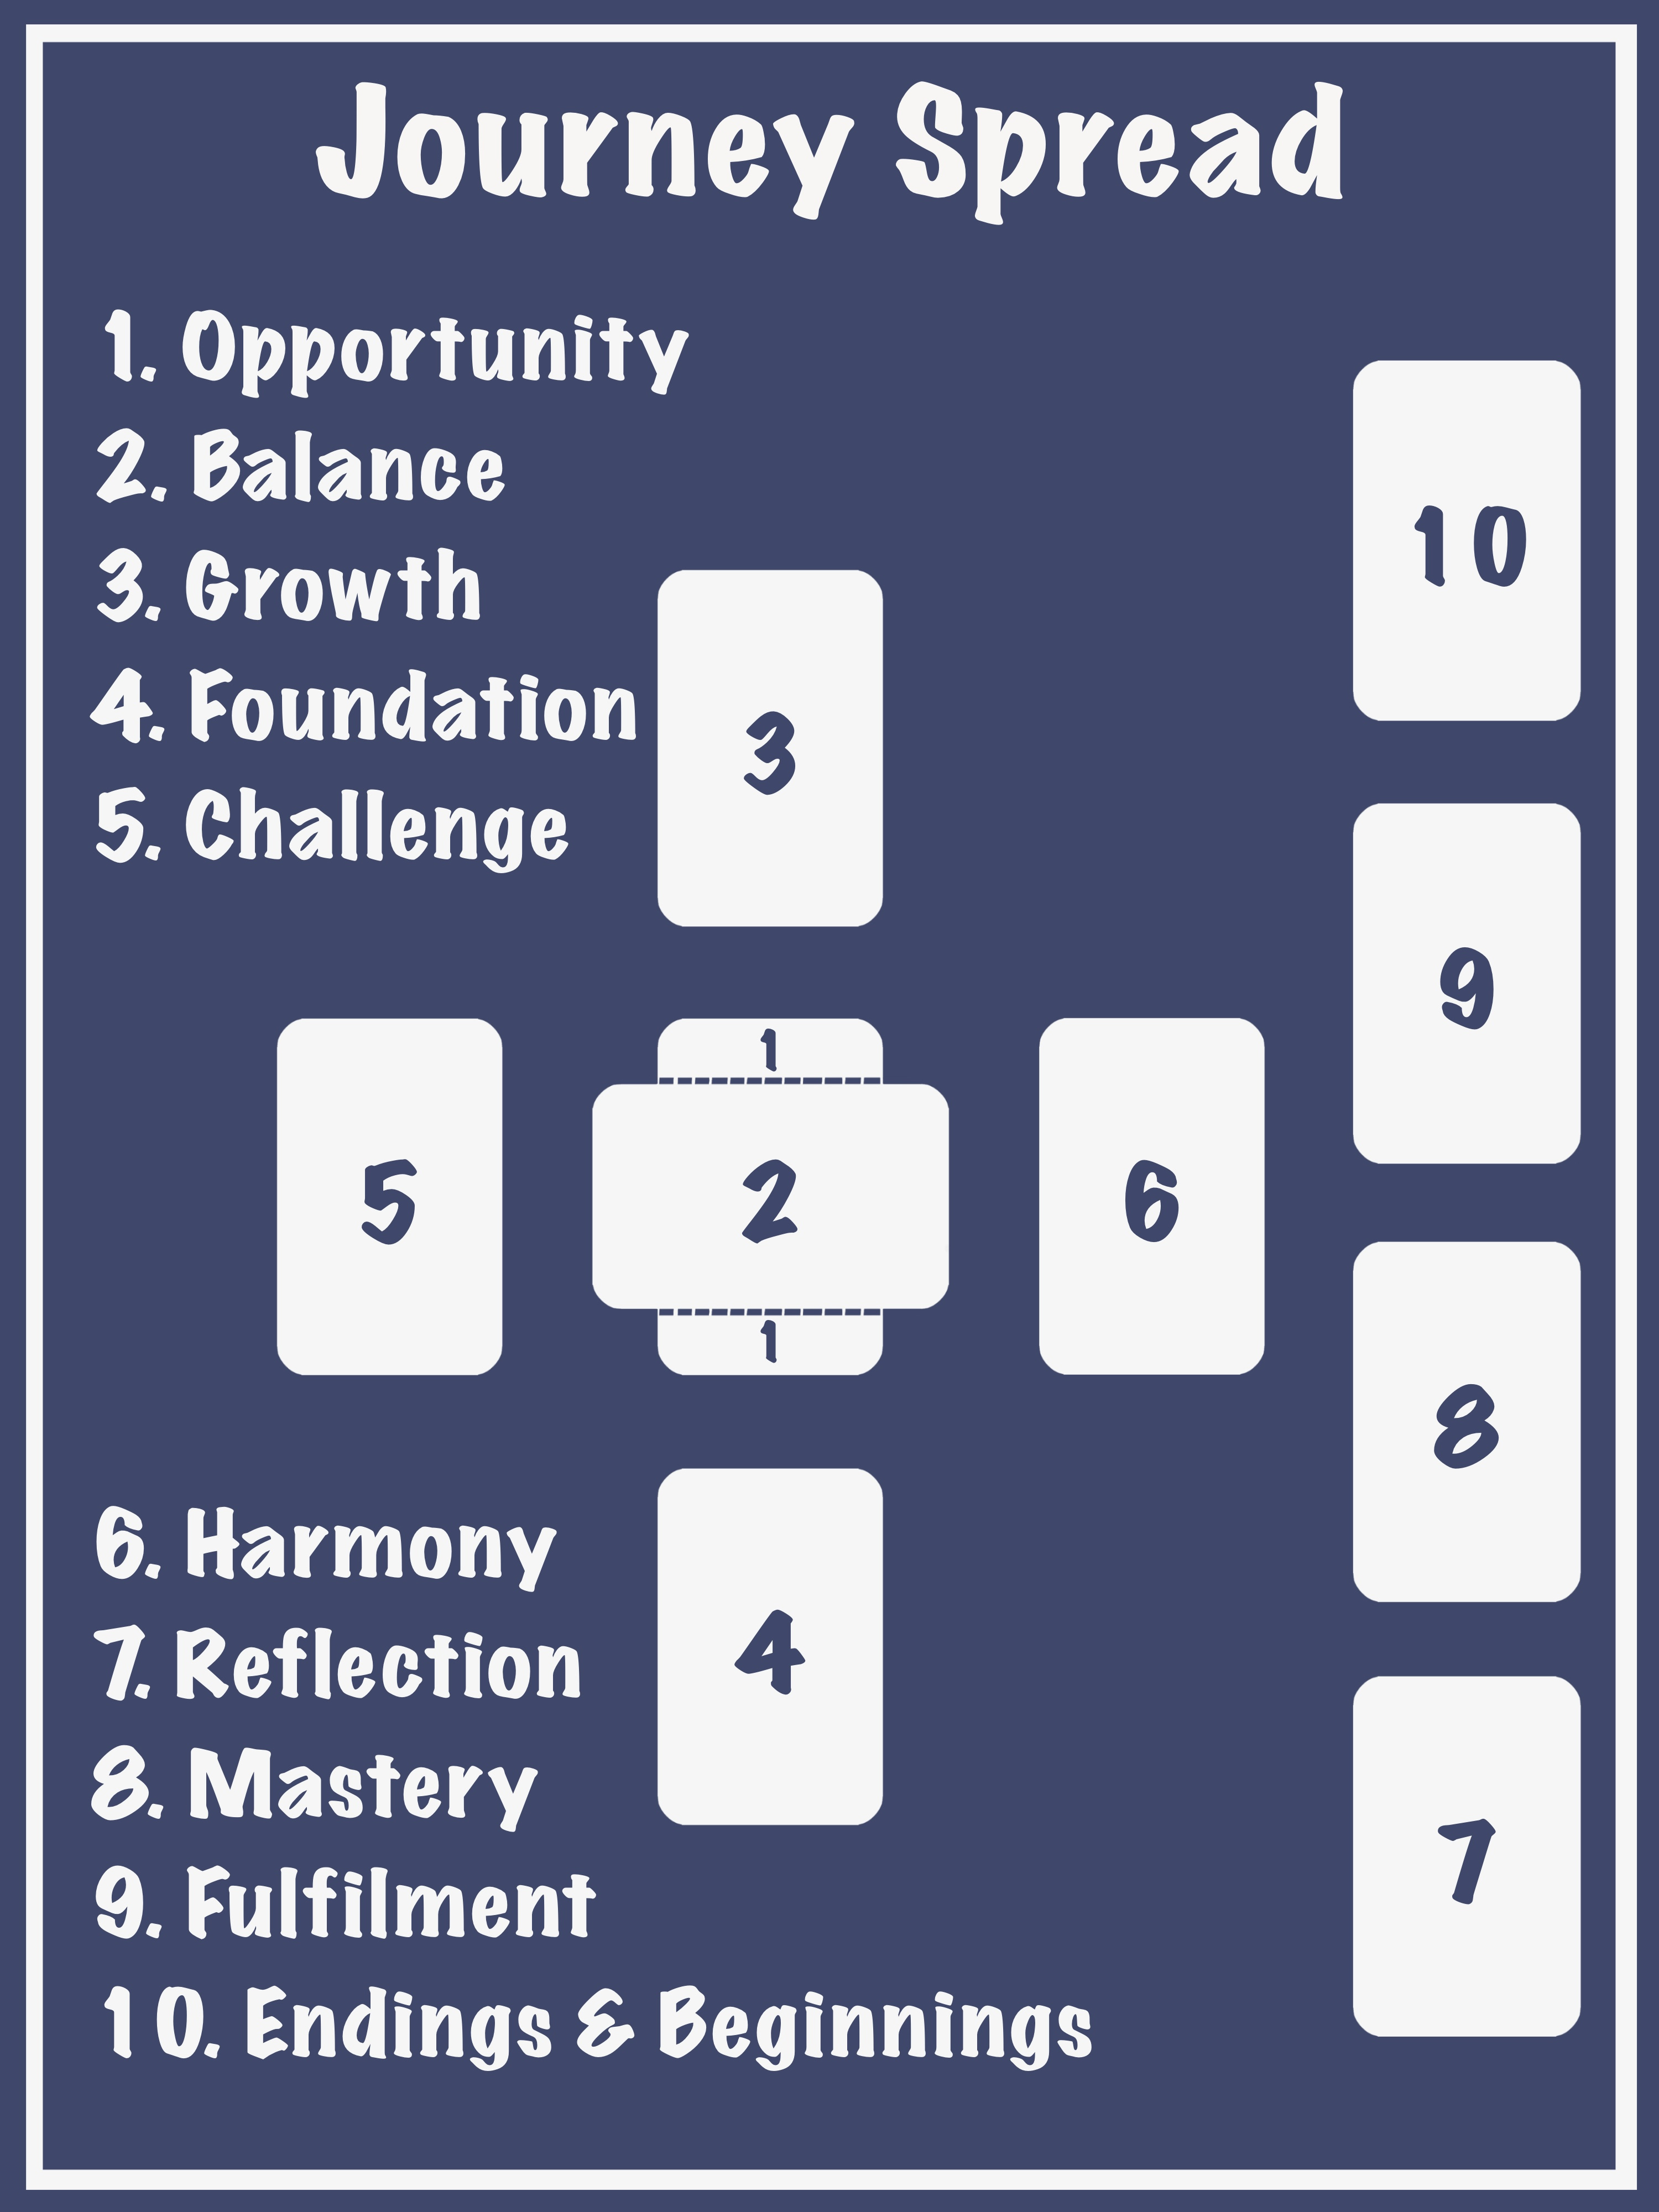
Journey Spread
This spread is intended to be used to help the querent think through the potential benefits of starting a new creative project.
What is the primary benefit of pursuing this project?
What will help you maintain balance while working on it?
What kinds of opportunities for creative growth does it provide?
What skills do you already possess that will help you succeed?
What challenges do you foresee?
What do you think will help you overcome those challenges?
What will you learn from working on it?
What skills will it help you develop?
What rewards can success bring?
What other projects might it inspire?
Thank you for sharing this! I’m so glad you are working on this passion project, and I can’t wait to see the final results!
I'm in love with the whole idea of this tarot deck Kristin and really enjoyed reading about your progress!